

This particular cake was for my Aunt Joan. I have three aunts in total, and two of them are named Joan. How does that happen? THIS Aunt Joan is from my Dad's side of the family and her birthday just happened and I totally got to make a cake for her! I had a massive brainstorming session for what kind of cake I wanted to make, and how to decorate it. All free time was dedicated to cake thoughts.
I wanted to make it special for her, so I asked around the family for some inspiration. Turns out, she has a thing for roses, yellow roses in particular. BAM! Inspiration. And the Yellow Rose Aunt Joan Cake is born.


This cake was to be served after a family dinner, in the summertime... so I wanted it to be light and summery, not too rich. Also, YELLOW! (After much indecision and debate) I decided to create something lemony and raspberry-y. Seemed like the right thing to do. And when in doubt, cream cheese frosting.


Lemon and raspberries feel like summer! Yellow and white with a splash of pink makes me happy.
I seriously had a lot of fun making this cake, from designing it, to baking, to decorating... Give me an occasion. I'll make you a cake. Please? Cool, thanks. Let's be friends.

Lemon Buttermilk Cake
Recipe from Martha Stewart
- 3 cups all purpose flour
- 1 tbsp baking powder
- 1/2 tsp salt
- 1 cup (8 oz.) butter
- 2 cups granulated sugar
- 4 eggs
- zest of 3 lemons (about 3 tbsp)
- 2 Tbsp lemon juice (about 1 lemon)
- 1 tsp vanilla
- 1 cup buttermilk
1) In a medium bowl, sift together the flour, baking powder and salt. Set aside.
2)Using an electric mixer, cream together the butter and sugar until light and fluffy. Add the eggs one at a time, scraping the sides of the bowl as needed. Blend in the lemon zest and vanilla.
3)Add the flour mixture in three additions, alternating with two additions of buttermilk and lemon juice. Blend until just combined.
4)Pour batter into greased and floured 8" cake tins. (I saved some batter to make into mini cupcakes... you know, for mandatory taste-testing and quality control)
5)Bake at 325 for about 30 minutes or until cake tops are springy and a toothpick inserted comes out clean.
*If you are making mini cupcakes, they will take about 15 minutes.
*If you are making regular sized cupcakes, they will take about 20 minutes.
6)Let cakes cool at least 10 minutes in the pan, then turn out onto wire racks to cool completely before frosting.
*Cakes can be stored in an airtight container at room temperature for one day, or wrapped in plastic and frozen for much longer!

Cream Cheese Frosting
- 8 oz cream cheese
- 2 oz butter
- 4 cups sifted icing sugar (you may need more depending on the temperature, my frosting was too soft so I added 1/4 cup extra)
- pinch salt
- 1 tsp vanilla extract
1) In a mixer bowl, cream together the butter and cream cheese until fluffy and completely combined. Gradually add the icing sugar about one cup at a time, beating until well combined after each addition. Beat in the salt and vanilla extract. Taste and adjust as needed. If frosting is too thin, add more icing sugar. Too thick? Add a tiny splash of milk.
Frosting can be used immediately or refrigerated in an airtight container for a few days, or frozen for up to three months.

For the filling of the cake, all I did was take about 1/3 of the cream cheese frosting and added a big handful of fresh raspberries and mashed it all up. I didn't blend it together completely because I was going for the marbled look. Pretty!
(A warning note: the raspberries I added were particularily delicious i.e. JUICY like mad and thinned out the frosting quite a bit. This made things a bit runny and messy and oozing-out-the-sides style when I layered the cake. Perhaps next time I will add more powdered sugar to help thicken it up. Once you put the first layer of frosting on the outside, however, if you stick the cake in the fridge it will firm up and help things along.)

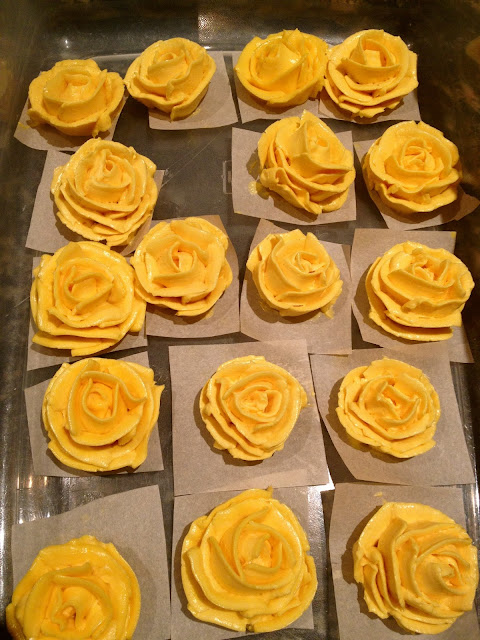
My first rose, woo!
Meringue Buttercream Roses
Recipe from Martha Stewart

Recipe from Martha Stewart
- 3 egg whites
- 1/2 cup plus 1 tbsp sugar
- pinch salt
- 1 cup (8oz) butter at room temperature
- 3/4 tsp vanilla extract
- Gel paste food colouring (I used a mixture or golden yellow and lemon yellow by Wilton)
1)In the heatproof bowl of a standing mixer whisk together the egg whites, sugar and salt. Set the bowl over a pan of simmering water and whisk constantly until the sugar has dissolved, about 2-3 minutes, the mixture should feel smooth when you rub it between your fingers.
2) Once the sugar has dissolved, remove the bowl from the heat and attatch it to your standing mixer. Starting on low speed and increasing to medium high, whip the egg white mixture until it is completely cool, white and glossy and forming slightly stiff peaks. (this takes about 10 minutes)
3) Reduce speed to medium low and add the softened butter one tablespoon at a time, beating until combined after each addition. If the mixture appears to "curdle" after adding the butter, FEAR NOT! This happens to me every. time. :( But the good news is all you have to do is keep beating, and whip that buttercream back into shape. Just beat it. Like Michael Jackson told you to.
4) Next mix in the vanilla extract and food colouring if desired. YELLOW!
5) You can use the buttercream immediately, or keep it in an airtight container in the fridge for a few days, or in the freezer for up to 3 months. Just bring back to room temperature and beat it some more to get the right consistency.
6) When you're ready to make the roses, fit a pastry bag with a petal tip, then fill the bag with your buttercream. You will also need 1 inch squares of parchment paper, a flower nail and an offset spatula is helpful when moving the flowers from the parchment to the cake.
7) I would reccommend watching a few youtube videos for a visual on how to pipe these flowers. They look complicated, but I found them to be quite simple. The petal tip does most of the work for you! And as always, Martha knows what's best: check out her instructions here. (I just used the petal tip, instead of switching back and forth between two and it worked out fine)

Cake Assembly
1) Place one cake layer on the platter you wish to serve it on. Spread with a thin layer of raspberry jam.
2)Spread the raspberry-marbled cream cheese frosting on top of the jam, no need to spread too far to the edges because it will ooze out otherwise when you put the next layer on.
3)Put the next layer on!
4)Spread a thin layer of cream cheese frosting over the top and sides of the cake, working fairly quickly because oh my goodness this frosting is oozing out the sides and turning my white frosting pinkish and hey maybe that's still cool it's kind of looking like ombre and that's totally in right now maybe I'll just let it happen! But please get a coat of cream cheese frosting on there, pop it in the fridge for at least 1 hour to firm up a bit. I left mine in the fridge overnight, and left the rest of the decorating for the next day which was the day of the party.

5) Using an offset spatula, transfer your buttercream roses from their parchment squares to the top of the cake, arranging how you like.
I had some leftover cream cheese frosting, so I tinted it green and piped some leaves around the roses.
6)Finish the cake off by arranging fresh raspberries around the bottom and TADAA

Slice it, serve with vanilla ice cream, on the patio in the backyard. Rock on.

<3 Lari
It looks moist and delicious.
ReplyDelete